Set up email provider
Many authentication use cases require sending emails to your users. Whether they are looking to verify their email address, reset their password, or be alerted of password changes, your users will need to receive these emails. This page shows the options for configuring email providers via the Purse Identity Console.
| See the Email templates page if you are looking for templates. |
Purse Identity integrates with the following email SaaS services:
|
We also provide:
|
SMTP providers
You should use the SMTP provider to send emails if you have a reliable SMTP server available that will be able to handle all automated email distribution.
SMTP provider setup
-
In the Purse Identity Console, go to .
-
Enter the SMTP configuration details.
-
Specify the
Fromemail address. This is what the recipients see as who sent the email. -
Enter any
Reply toemail addresses that you wish to have. (Optional)When users reply, it will be sent to these emails. -
Enter the host for your SMTP server.
-
Enter the port for that host SMTP server.
-
Enter your username for the SMTP server.
-
Enter the password associated with the above username for the SMTP server.
-
Check
SSLorTLSdepending on your requirements.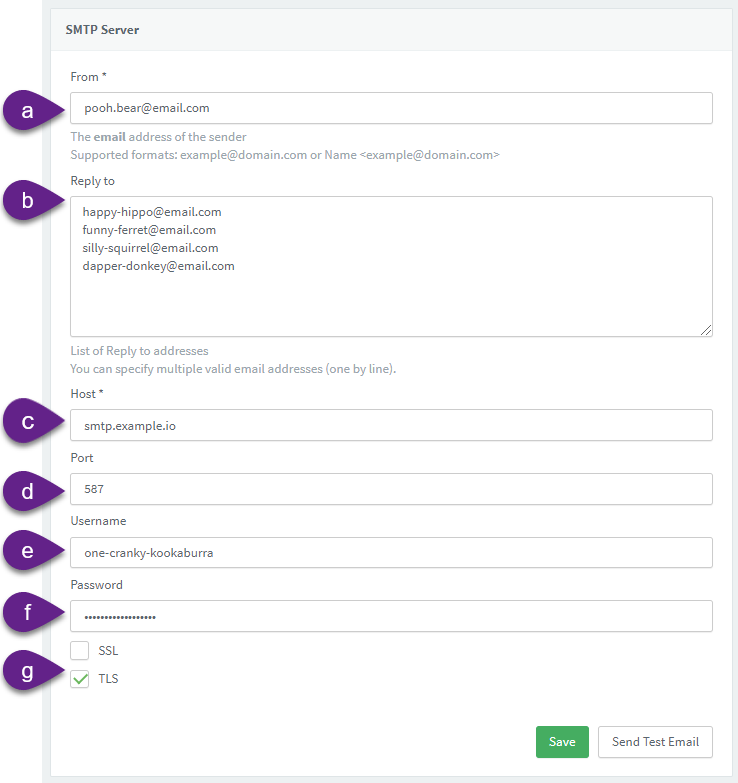
-
-
Select Send test email to validate the configuration.
The email is sent to the address of the user currently logged in. -
Don’t forget to Save your input.
Custom providers
You should use the generic Email API to send emails when:
-
Purse Identity Console does not provide a native integration with your SaaS solution. You need to implement the generic email API, and then send your emails from your system as you would.
-
You use a custom or in-house piece of software to manage emails. You will need to implement the generic API and then map the data sent to your template and email service.
Custom message payload forward compatibility
We sometimes enhance our services by adding new variables and fields to custom Email and SMS payloads.
To ensure your integration remains stable:
-
Do not use strict schema validation on the JSON payloads received from Purse Identity.
-
Ignore unknown fields: Your integration must be designed to gracefully ignore any variables or keys it does not recognize.
| Failure to follow this practice may cause your service to break when new features are released. This approach ensures that your integration continues to function correctly even as we introduce new features and enhancements. |
Provider setup
-
In the Purse Identity Console, go to .
-
Select Custom provider
-
Specify the endpoint where you would like Purse Identity Console to send email requests.
Purse Identity treats any response other than 4xxor5xxas a success. -
If needed, enter the
HTTP Authorization value. For example:Basic dm9yZGVsOnZvcmRlbA==. (Optional) -
Under Fields, choose which keys are sent in
personalizations. The same list is used for every template.Fields groups keys into Standard fields, Message fields, and Custom fields. In the dropdown those groups are headed Profile Fields, Message Fields, and Custom Fields. Standard fields and Message fields start selected. Custom fields stay unselected until you add them. emailandtemplate_idare always sent, and they are not in this list. An empty Fields list sends only those two keys. A provider saved before this change keeps the fields it already sent, plus any custom fields you had already selected. A selectedcustom_fieldsentry is sent only when that field is present on the profile. -
Select Send test email to validate the configuration.
The email is sent to the address of the user currently logged in. -
Don’t forget to Save your input.
- Select the endpoint where you would like Purse Identity to send requests
-
An example request and payload are as follows. This sample is one possible Fields selection.
personalizationsincludes only the keys you selected. A selected key is omitted when that template has no value for it.emailandtemplate_idare always sent.POST https://YOUR_DOMAIN{ "email": "clarence@example.com", "template_id": "password_reset", (1) "personalizations": { "id": "id", "client_id": "jQy...TGlj", "external_id": "externalId", "given_name": "Max", "last_name": "Robertson", "gender": "M", "has_password": true, (2) "lang": "fr", "locale": "fr-FR", "verification_code": "verificationCode", "redirect_url": "https://www.example.com/redirect", "lite_only": true, (3) "custom_fields": { (4) "loyalty_id": "123456" } } }1 The template_idis the email template. This is the ID for the template found at or alternatively for MFA at .2 The has_passwordvalue is included only for thepassword_resettemplate, and only when you selected that field.3 The lite_onlyvalue is included when the profile is a lite profile and you selected that field.4 The custom_fieldsobject contains the custom fields you selected, when those fields are present on the profile.
|
The
|
Custom personalization fields
These are the personalizations keys you can select under Fields.
The Purse Identity Console groups them into Standard fields (profile data), Message fields (values from the message), and Custom fields.
Purse Identity sends a selected key only when that template has a value for it.
-
Standard fields
-
id -
external_id -
given_name -
last_name -
gender -
has_password -
lite_only -
lockout_end_date
-
Message fields
-
verification_code -
redirect_url -
lang -
locale -
client_id -
action -
accept_url -
reject_url -
consent_title -
consent_description -
ip -
user_agent -
operating_system -
device_class -
device_name
Custom fields
-
custom_fields*
* custom_fields are the custom fields you select.
They are sent as an object, and only when they are present on the profile.
Adobe Campaign
You can integrate your Adobe Campaign Classic or Standard account with Purse Identity directly in the Purse Identity Console allowing you to leverage the digital marketing campaigns and personalized messages already established with Adobe Campaign.
|
This article only covers the steps in the Purse Identity Console. You’ll need the following information from your Adobe account in order to proceed:
For more information on how to find these items, see the Adobe Campaign Standard documentation. |
Instructions
-
In the Purse Identity Console, go to .
-
From the Client Type dropdown, choose Adobe Campaign Standard/Classic.
-
Enter your Tenant ID.
-
If desired, enable Use OAuth Credential. Doing so will grey out the standard JWT credential option.
-
Go to on your Purse Identity Console.
-
Select Adobe Campaign Standard from the list of options.
-
Enable Use OAuth Credential.
-
Enter your Client ID, Client secret, and desired Scope(s).
-
Enter your API Key.
-
Enter your Adobe Campaign Standard Client Secret.
-
Enter your Adobe Campaign Standard Organization ID.
-
Enter the Technical Account ID of the account you want to access.
-
Paste the Private Key that corresponds to the public key provided with your Adobe Campaign Standard settings.
-
-
Don’t forget to Save your input.
Dialog Insight
You can integrate your Dialog Insight account with Purse Identity directly in the Purse Identity Console allowing you to leverage the digital marketing campaigns and personalized messages already established with Dialog Insight.
|
This article only covers the steps in the Purse Identity Console. You’ll need the following information from your Dialog Insight account in order to proceed:
For more information on how to find these items, see Dialog Insight support. |
Instructions
-
In the Purse Identity Console, go to .
-
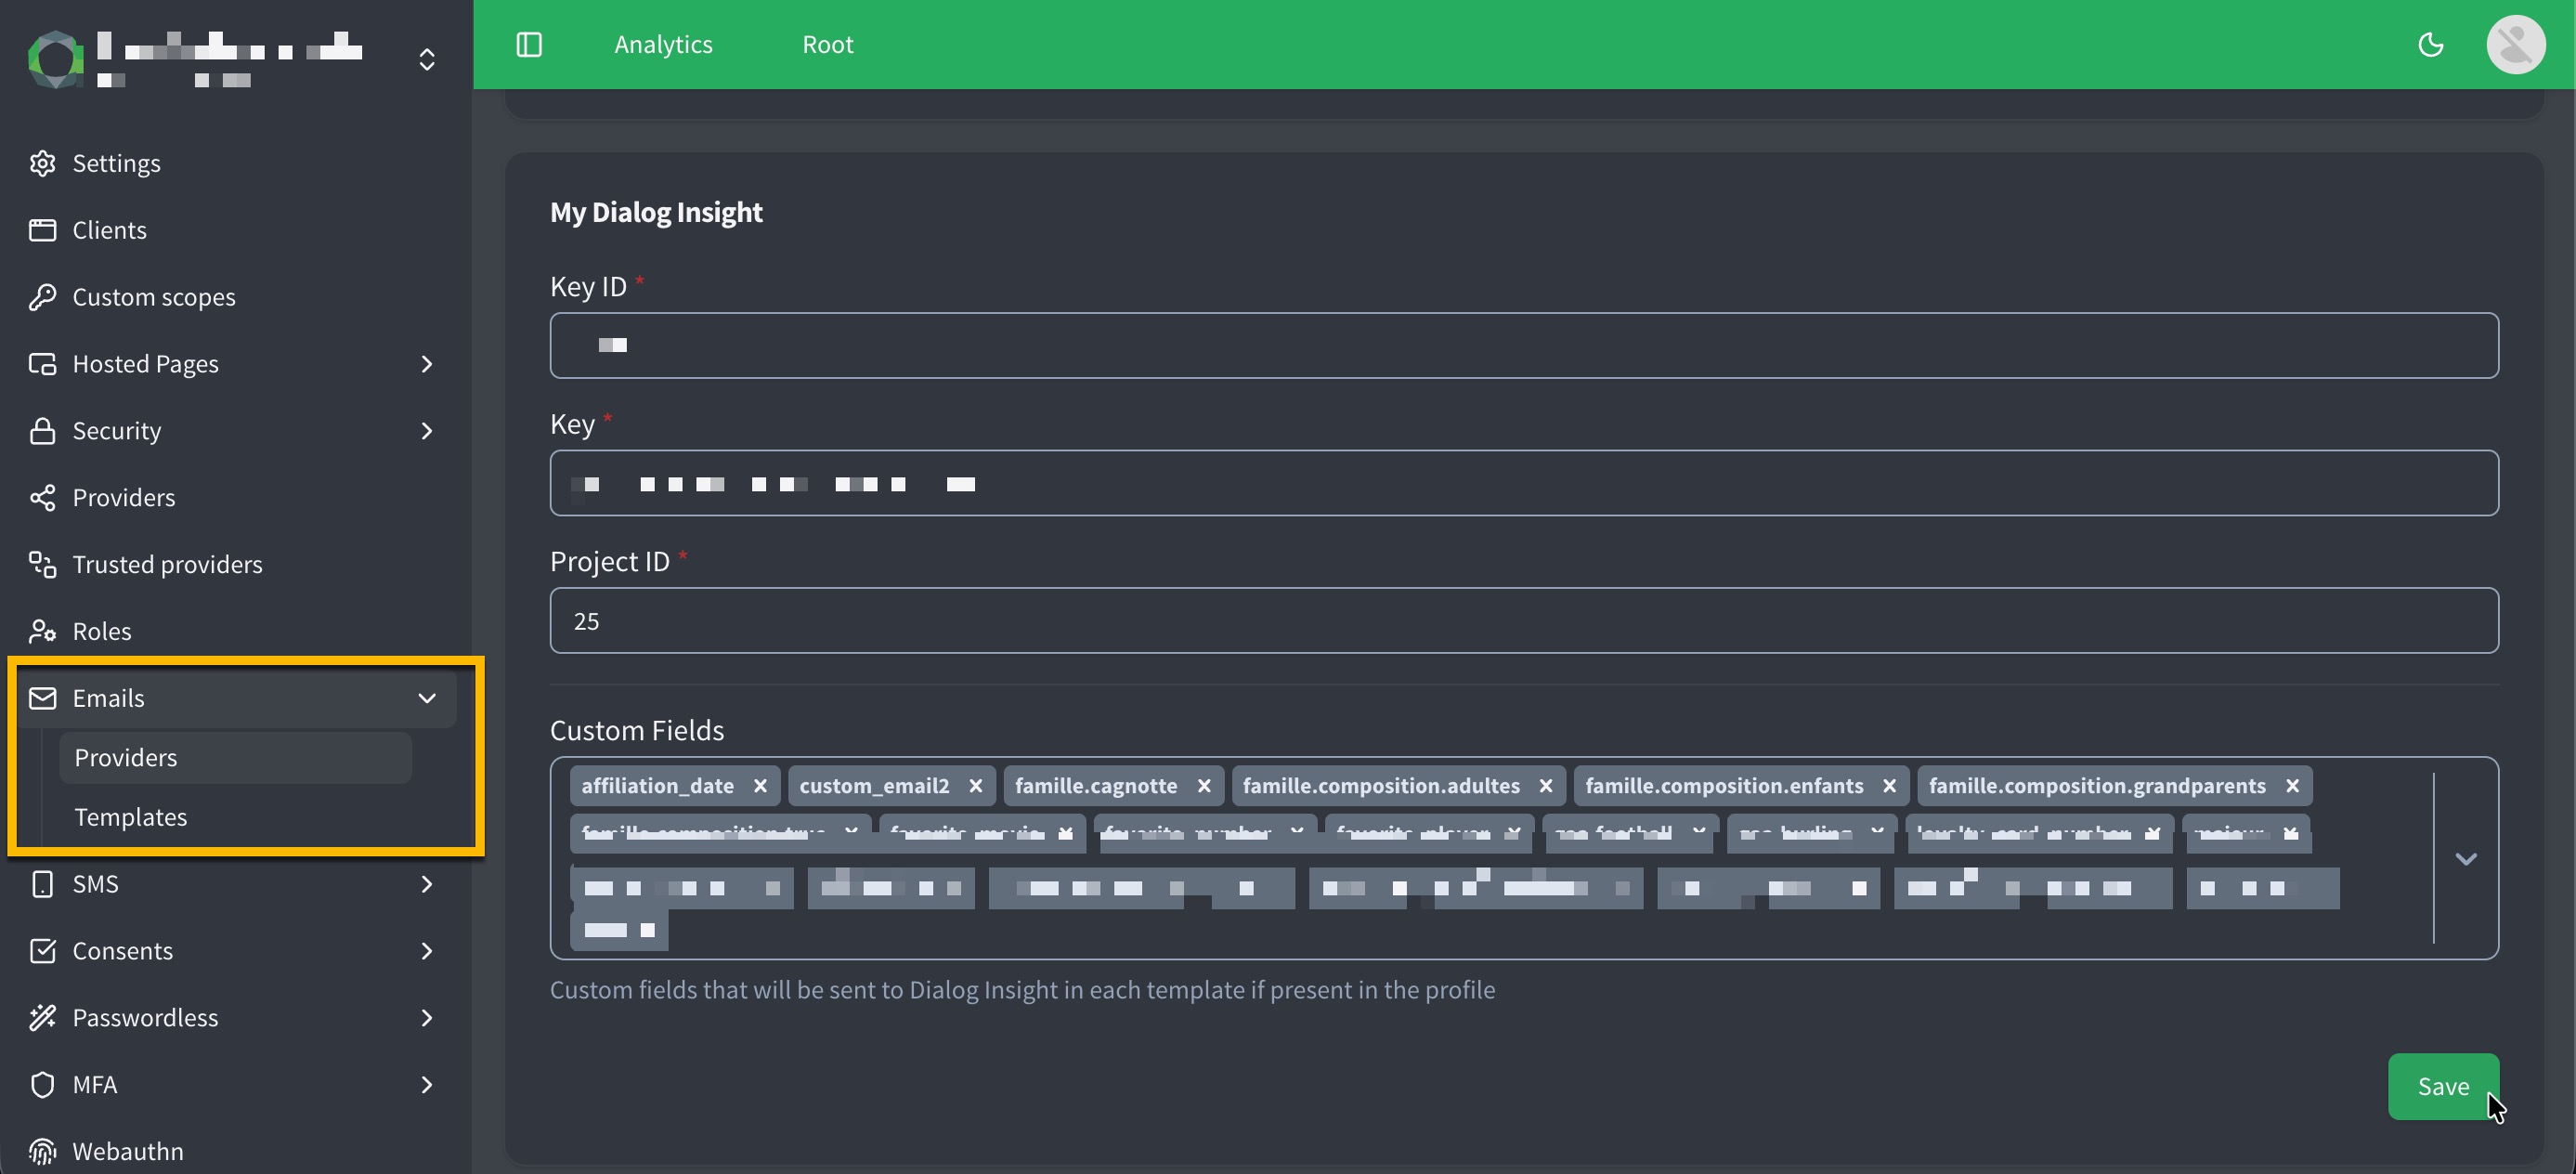
From the Client Type dropdown, choose Dialog Insight.
-
Enter your Key ID.
-
Enter your Key information.
-
Enter your Dialog Insight Project ID.
-
If desired, choose the custom fields to send with each Dialog Insight message.
Custom Fields lists the profile custom fields that Purse Identity may forward to Dialog Insight. Leave a field unselected if it should stay in Purse Identity only.
Until you save this list, every custom field continues to be sent. After you save, only the selected fields are sent, and only when they are present on the profile. New custom fields you create later are not sent until you add them here. If you select none, no custom fields are sent.
If you delete a custom field from the profile schema, it is also removed from this list.
-
Don’t forget to Save your input.
Message parameters
Selected custom fields are sent as a customFields object on the Dialog Insight message.
Each send also includes clientId, the client ID used to perform the API call.
This can be an Identity or Management client.
Declare it on the Dialog Insight message if several Purse Identity clients share this project and the template should know which app triggered the email.
Parameters that are not defined on the Dialog Insight message are ignored, so the email is still sent.
Oracle Responsys
You can integrate your Oracle Responsys account with Purse Identity directly in the Purse Identity Console allowing you to leverage the digital marketing campaigns and personalized messages already established with Oracle Responsys Campaign Management.
|
This article only covers the steps in the Purse Identity Console. You’ll need the following information from your Oracle account in order to proceed:
For more information on how to find these items, see the Oracle Responsys Help Center. |
Splio
You can integrate your Splio account with Purse Identity directly in the Purse Identity Console allowing you to leverage the digital marketing campaigns and personalized messages already established with Splio.
|
This article only covers the steps in the Purse Identity Console. You’ll need the following information from your Splio account in order to proceed:
For more information on how to find these items, see Splio resources. |
Retry policy
When Purse Identity cannot deliver a message through your provider, it retries automatically before giving up.
This policy applies to the following templates:
Purse Identity makes up to 4 delivery attempts: one initial attempt, then 3 retries.
After each failed attempt, Purse Identity waits 10 seconds before trying again.
Each failed attempt creates an email_failure user event.
| See User events for event fields and a sample payload. |
| Other transactional messages (such as signup verification or MFA codes) are sent once. If delivery fails, a single failure event is still emitted. |